AwsSendDataOverMQTT
Before you start
The XDK AwsSendDataOverMQTT application shows how to use the MQTT protocol to transfer the sensor data to an AWS server using Amazon FreeRTOS. In advance install the XDK Workbench, at least version 3.6.0
Structure of the Quick Start Guide
- First steps
- Steps to generate the certificate
- Steps to create an AWS IoT policy
- Steps to attach an AWS IoT Policy to a Device Certificate
- Steps to flash the application and see the data sent over MQTT
A. First steps
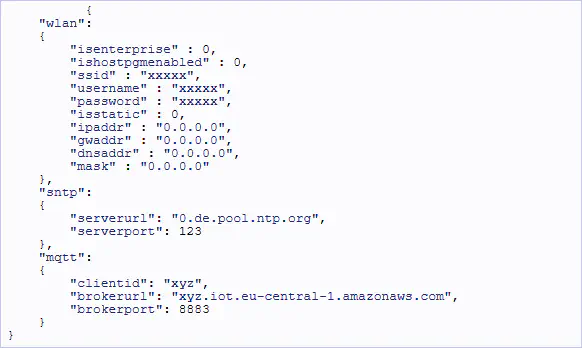
1. Find the files placed under AwsSendDataOverMQTT/source/config (4 files)

2. Modify the config.txt with ssid, password, serverurl, brokerurl and broker port as shown below in config.txt. picture.
Note brokerurl: see point 3
3. Go to “IoT Core” available under “Services”, after logging into http://console.aws.amazon.com/. If you don’t have an existing account you have to create a new AWS account. Afterwards The Home page will open as shown below
The brokerurl for the config.txt can be found under “Settings” under the “Endpoint” field**.**
B. Steps to generate the certificate
1. To create the certificate follow the steps below. Go again to the IoT core page, available under Internet of Things
1.1 Go to “Manage”, then click on “Things”

1.2 Create a device under Things, by clicking “Create”
1.3 Click on “Create a single thing” and then name your device under “Name” and klick next

1.4 Afterwards click on “Create certificate”, then you have two possibilities to create one

- First is for a newly created device. Download the certificate as shown on “1” and ”2” and then click on ”3” -> “Activate”. If it’s not activated then the device will not subscribe. So every time the device should be activated when you flash the code<…>

- Second is if your device is already created. Go to the created device for example “XDK-Custom”, click on “Security” and then you press “Create certificate”

You can download the root CA certificate here: sf-class2-root.cer
More information about Amazon Trust Services CAs can be found here: how-to-prepare-for-aws-move-to-its-own-certificate-authority
The root CA is already in the correct format and only needs to be renamed to “rootCA.der”. The endings of the 2 other files “.pem.crt.txt” and “.pem.key” can easily be renamed to “.pem”. Afterwards these 2 files should be converted to “.der”. To do this, go to the location where the files are stored, open the git bash and use the commands below:
$ openssl x509 -outform der -in Downloaded-certificate.pem -out xdk-cert.der
$ openssl rsa -outform der -in Downloaded-private.pem -out xdk-priv.der
Note: “Downloaded-certificate.pem” and Downloaded-private.pem" are the downloaded file names. “xdk-cert.der” and “xdk-priv.der”, which can be named anything, are the files that will be created. If you use the file names given here you don’t need to change anything in the source code. If you want to give your own file names, you should modify the defines as described in E. Steps.
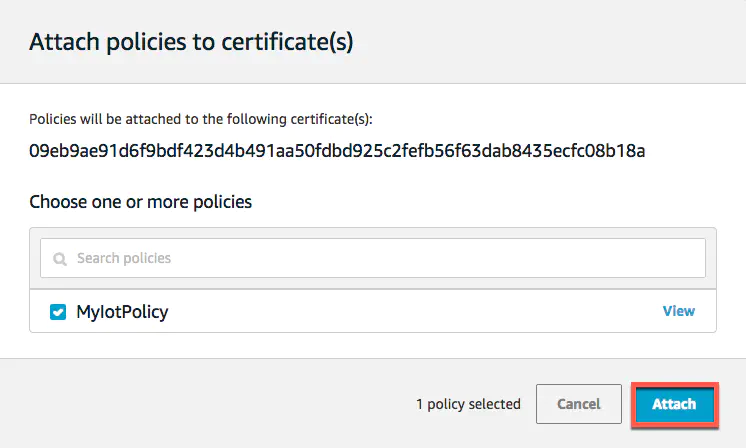
C. Steps to create an AWS IoT policy
X.509 certificates are used to authenticate your device with AWS IoT. AWS IoT policies are used to authorize your device to perform AWS IoT operations, such as subscribing or publishing to MQTT topics. Your device presents its certificate when sending messages to AWS IoT. To allow your device to perform AWS IoT operations, you must create an AWS IoT policy and attach it to your device certificate.
1. In the left navigation pane, choose “Secure”, and then choose “Policies”. On the “You don’t have a policy yet page”, choose “Create a policy”.

2. In the box for the certificate you created, choose … to open a drop-down menu, and then choose Attach policy.

3. In Attach policies to certificate(s), select the check box next to the policy you created in the previous step, and then choose Attach.
E. Steps to flash the application and see the data sent over MQTT
1. Modify the AppController.c file in the Workbench, with the above modified certificate name
APP_ROOT_CA_FILE_NAME -–> root CA certificate file name
APP_PRIVATE_KEY_FILE_NAME -–> created by “A private Key” file name
APP_CLIENT_CERT_KEY_FILE_NAME -–> created by “A certificate for this thing” file name
2. Place the generated certificates, after converting to .der format along with config.txt file, in the SD Card. Then, after modified compile and flash the application, after the SNTP is success and the data can be seen in TeraTerm or in any console window
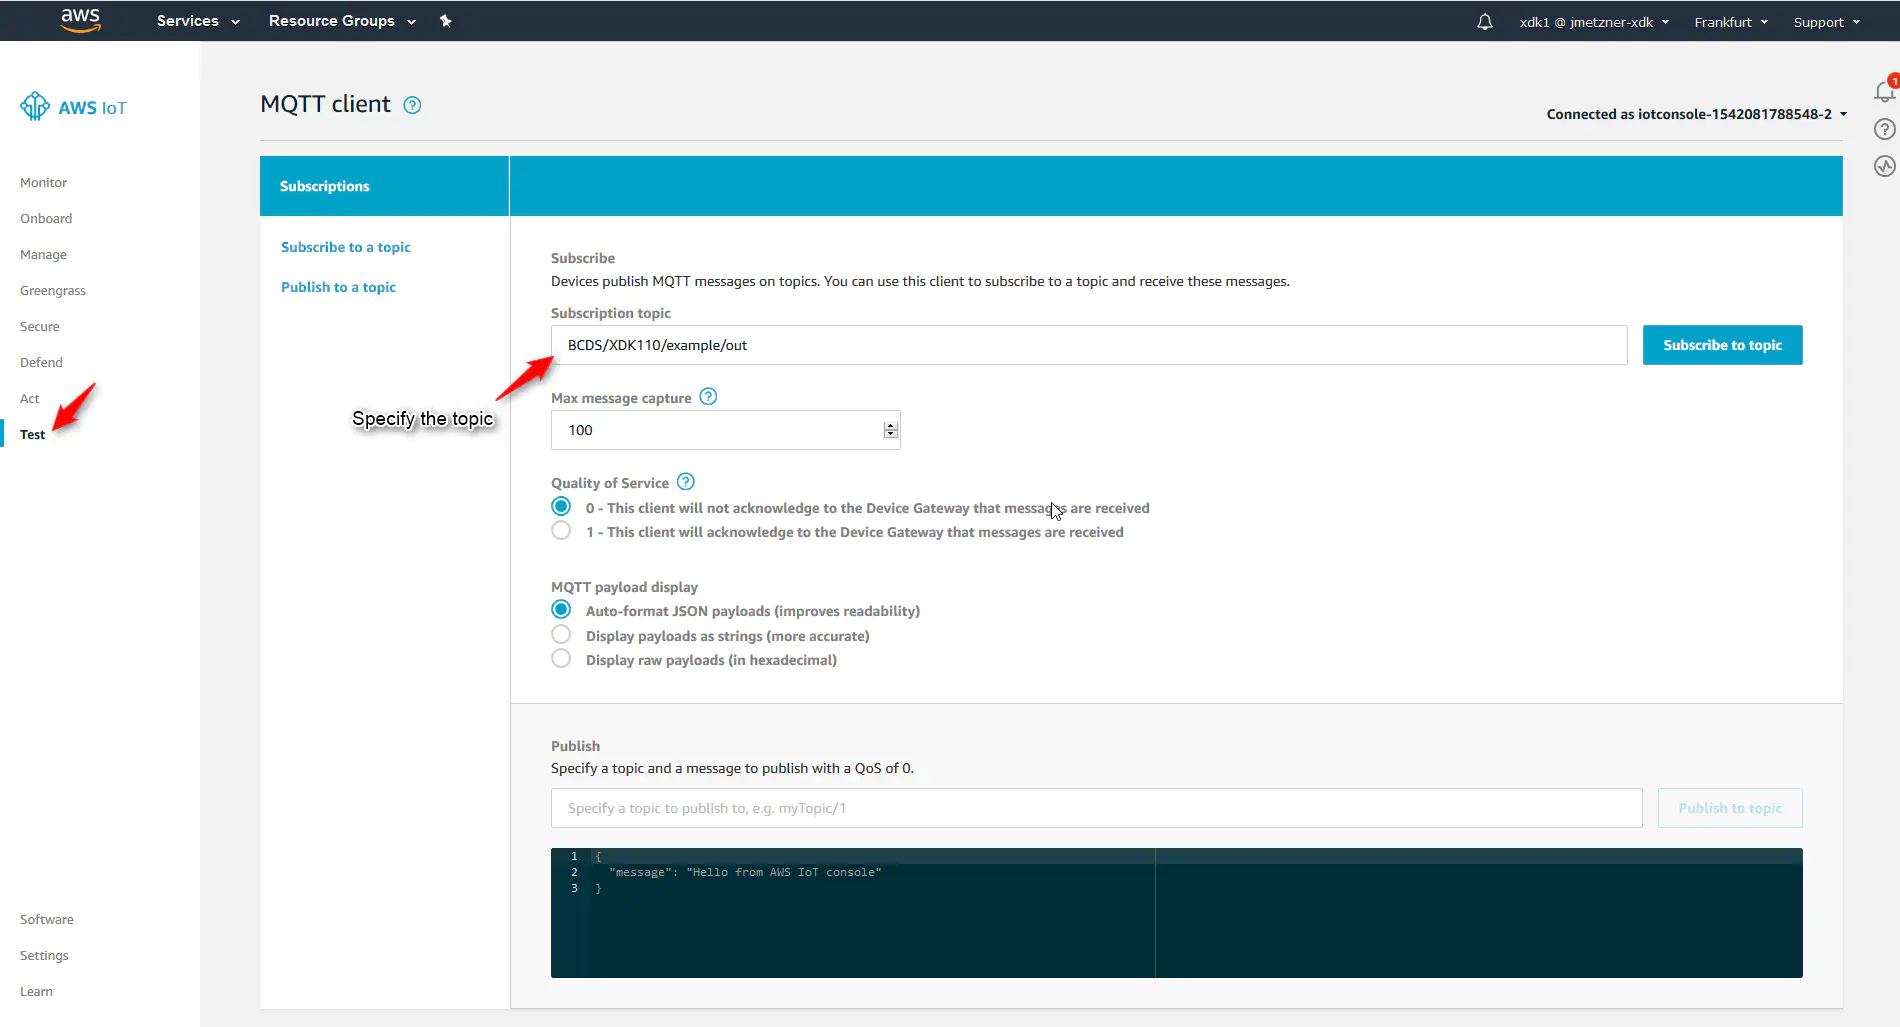
3. Next click on “Test” and specify the topic e.g. : “BCDS/XDK110/example/out” as mentioned in application and “subscribe to topic”
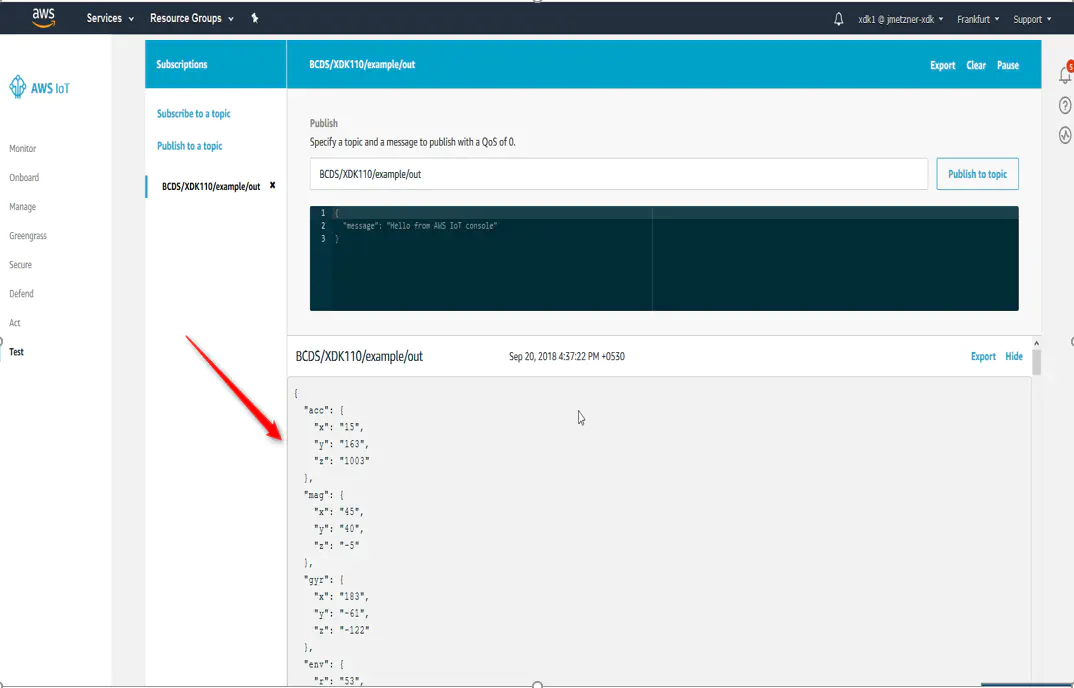
4. After subscribing you can see the data streaming, as shown in the picture below
5. Once the application runs, the files in the SD card are being converted to .bkp. The files can be modified again by placing the .der in the SD Card whichever file is required