AzurePlugAndPlay
Introduction
The AzurePlugAndPlay application is aimed at simplifying the development of your IoT solutions. Through this application you will be able to access the data from all built-in sensors of XDK110 and get the luxury of easy connectivity with Azure using X.509 certificates. This application will enable you to select which all sensors to be enabled, at what time they need to be sampled, at what time the mean value of sampled data should be sent to Azure. In addition to these, the application supports heart beat message operations and reboot command support. This quick start guide is intended for you to make use of the AzurePlugAndPlay application with Azure IoT Central Application service. You will also be provided with an additional detail at the end, regarding how to connect with the Azure IoT Hub service as well.
Before you start
- It is mandatory that the firmware of the built-in CC3100 WiFi chip has to be updated before flashing the AzurePlugAndPlay application to XDK110. This will enable the WiFi chip to handle TLSv1.2. Please refer the ‘Wi-Fi Module Upgrade’ documentation for understanding how to update the WiFi chip firmware.
- The CC3100 WiFi chip can support certificates of maximum length 2048bytes only.
- In order to create an X.509 certificate for the device, you will be needing OpenSSL installed in the system as well.
Overview
- Create Azure IoT Central application
- Create X509 certificates
- Create enrollment group and verify root X509 certificate
- Customize and publish device template
- Update configuration file
- Keep the configuration file and credentials in SD card
- Flash the application to your device and get connected
- Additional details Connecting to IoT Hub
Steps to Follow
Create Azure IoT Central application
Follow the steps discussed in the ‘Create An IoT Central Application’ for quickly deploying an Azure IoT Central application.
Create X509 certificates
For easy creation of X.509 certificate you can make use of the CACertificates tool provided by Azure. You can either access this github link to get the tool or else you can go to the location ‘AzurePlugAndPlay/SDK/xdk110/Libraries/AzureIotSdkForC/3rd-party/azure-iot-sdk-c/tools/CACertificates’ within the workbench.
The X.509 Certificates created by these scripts MUST NOT be used for production. They contain hard-coded passwords (“1234”), expire after 30 days, and most importantly are provided for demonstration purposes to help you quickly understand CA Certificates.
2.1. Edit certGen.sh file within the CACertificates tool and change from key_bits_length=“4096” to key_bits_length="2048". This is mandatory as CC3100 WiFi chip can support maximum key length of 2048bytes.
2.2. Open Bash in the folder where certGen.sh is located and run below command to set permission
chmod 700 certGen.sh
2.3. Run the command below to create root CA ('azure-iot-test-only.root.ca.cert.pem') and intermediate certificate within a new subfolder “./certs/”.
./certGen.sh create_root_and_intermediate
2.4. Replace the <> section with a device name of your choice and run the following command to create X.509 device certificate and private key pair. This will create the files ./certs/new-device.* that contain the public key and PFX and ./private/new-device.key.pem that contains the device’s private key.
./certGen.sh create_device_certificate
For example, ./certGen.sh create_device_certificate myXdk110
2.5. Execute the following command to change directory to certs and convert the device certificate to DER format and rename it to devCert
cd ./certs && openssl x509 -in new-device.cert.pem -inform PEM -out devCert.der -outform DER
2.6. Execute the following command to change directory to private and convert the private key to DER format and rename it to privKey
cd ../private && openssl rsa -in new-device.key.pem -inform PEM -out privKey.der -outform DER
Please don’t close the bash window yet, we will be in need of it in coming steps
Create enrollment group and verify root X.509 certificate
3.1. Go to the Azure IoT Central application created during first step 1. You can select and access your central application from this page : https://apps.azureiotcentral.com/myapps
For example, here we have considered a central application created by the name your_xdk110_central_app
3.2. Create new enrollment group
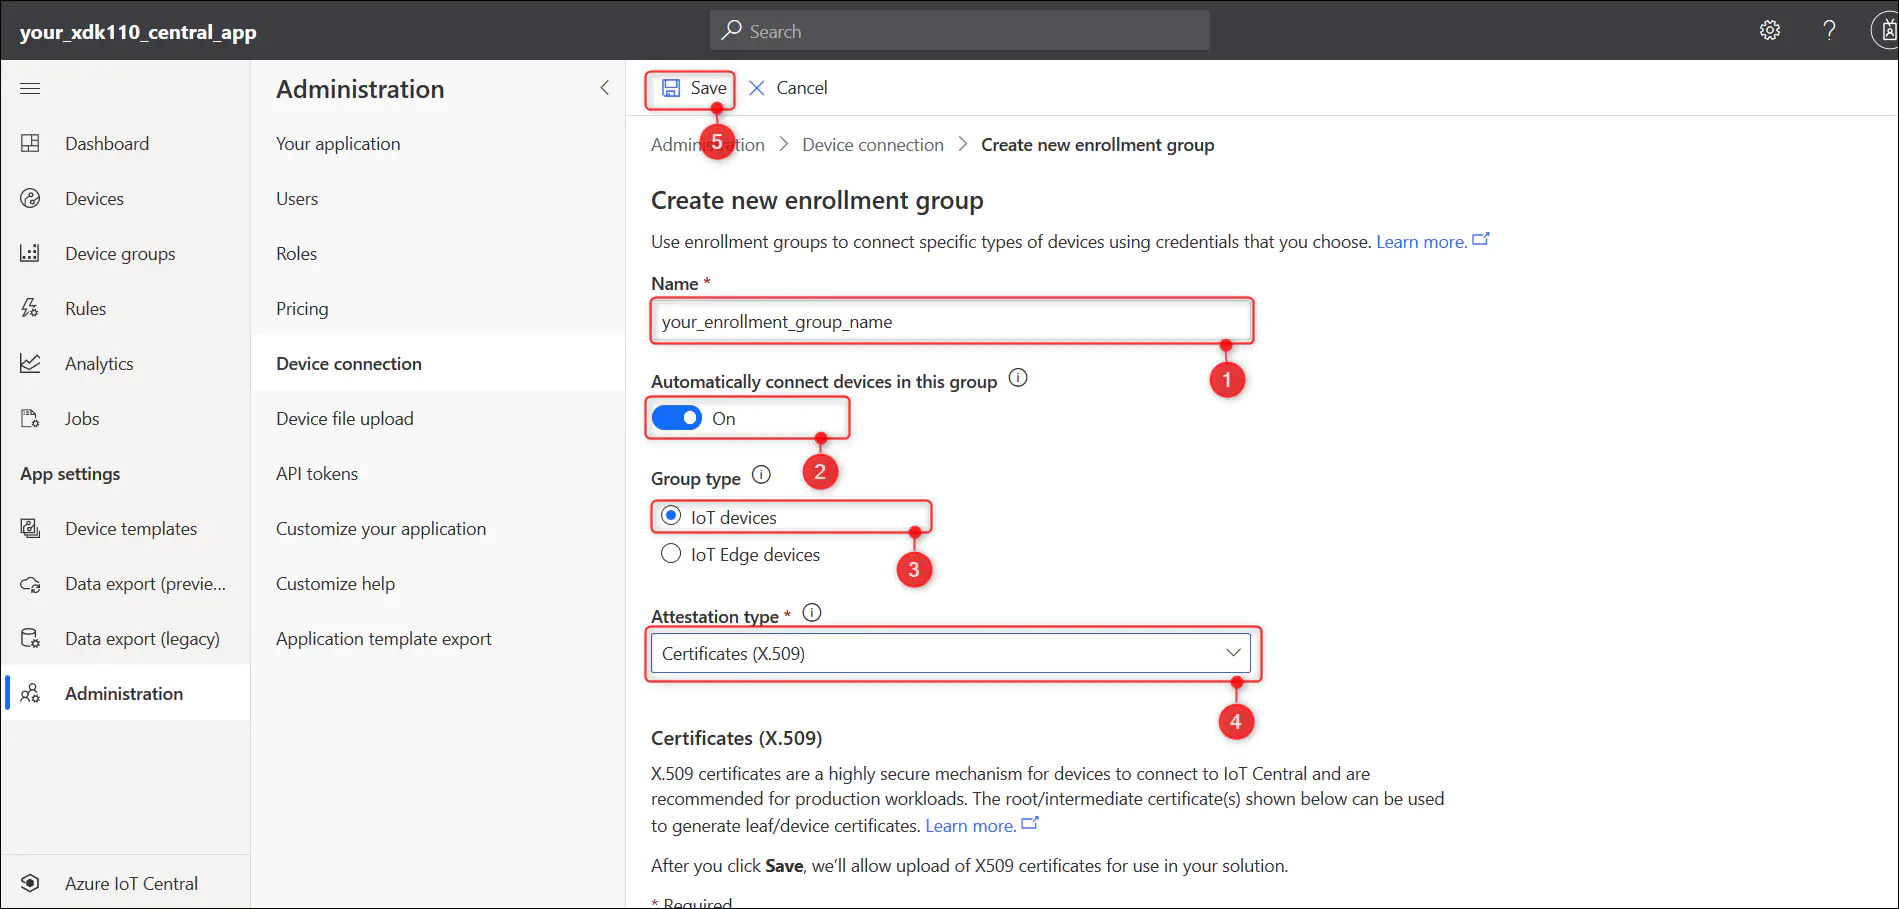
3.2.1. Go to ‘Administration’ and select ‘Device connection’ option and then select ‘+ Create enrollment group’ option.
3.2.2. Give name of your choice to the enrollment group and follow the steps as shown below to create and new enrollment group
3.3. Upload and verify X509 root certificate
3.3.1. Once the group details are saved, you will be able to scroll down and select the option ‘Manage Primary’. This will open ‘Primary Certificate’ pop up screen
3.3.2. Click Browse icon and specify the path to X.509 root certificate 'azure-iot-test-only.root.ca.cert.pem'. This file will be available from the create X.509 certificate step.
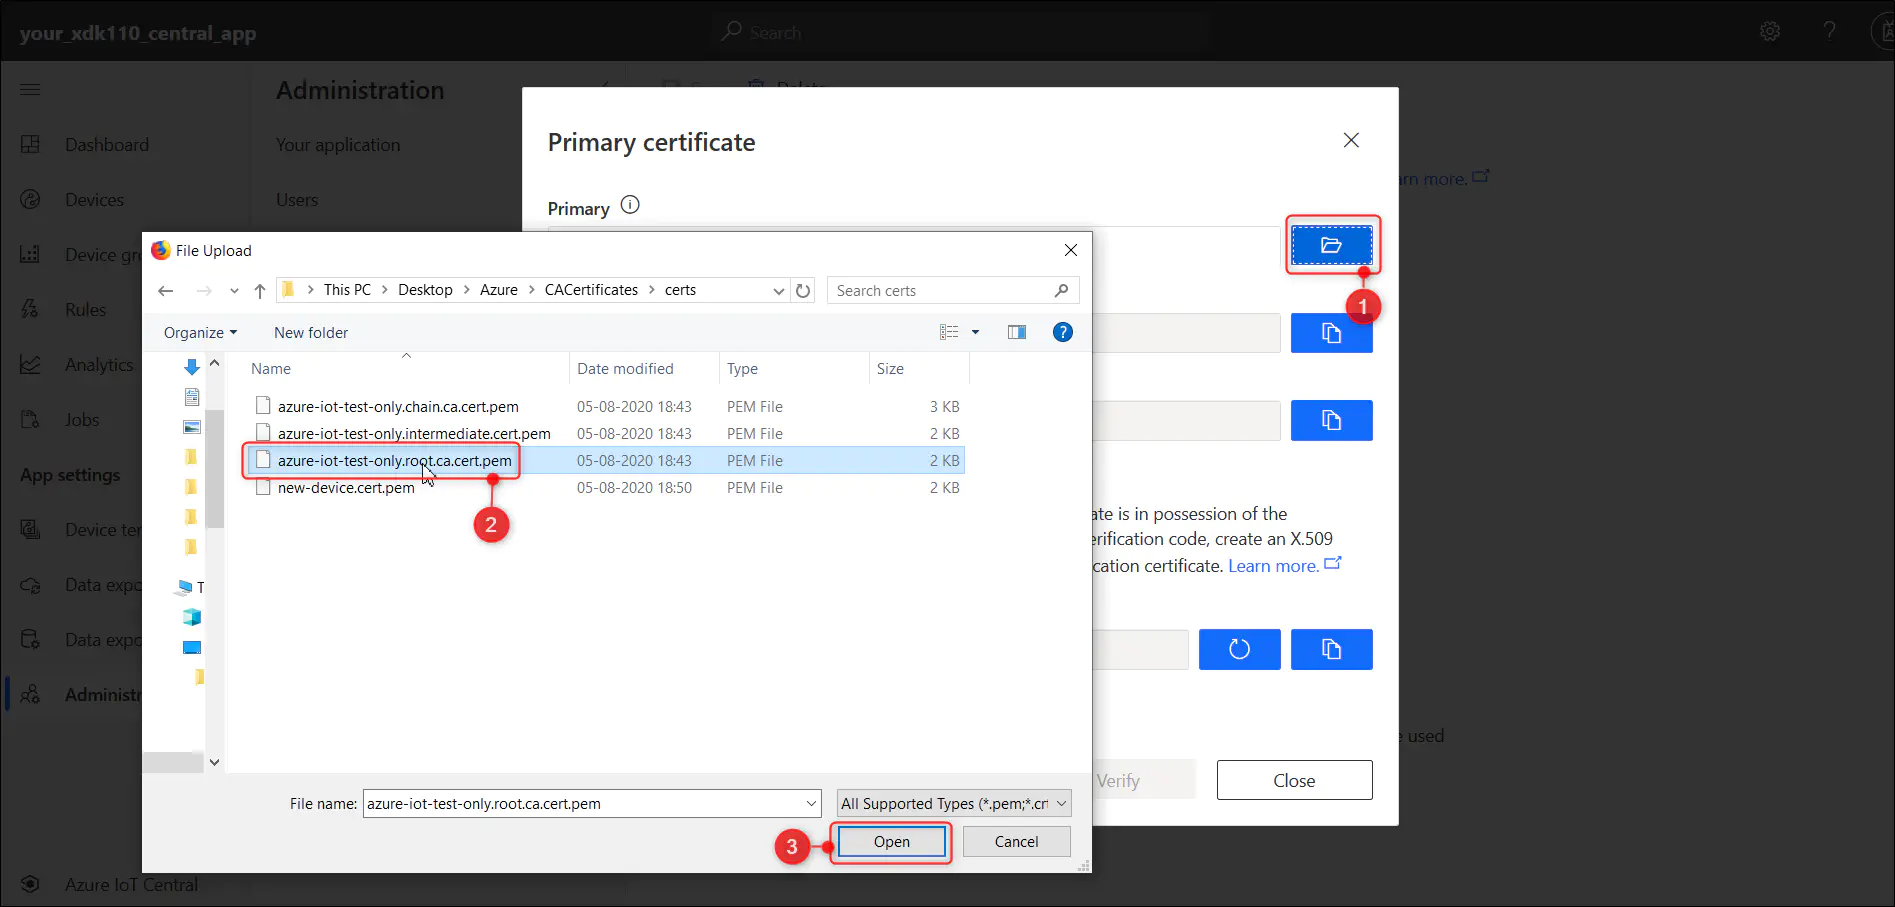
Once uploaded, the rest of the fields within the popup screen will get auto populated. A warning message will show that the uploaded certificate ‘Needs verification’
3.3.3. Copy the auto generated verification code by clicking on the copy to clipboard button.
3.3.4. Go to the Bash screen and change directory to the CACertificate tool folder(w.r.t the example screenshot, Desktop/Azure/CACertificate/ ) and execute the following command. Please replace the <> section with the copied verification code.
./certGen.sh create_verification_certificate
This step will create a new verification certificate by the name verification-code.cert.pem in the ‘./certs/’ folder
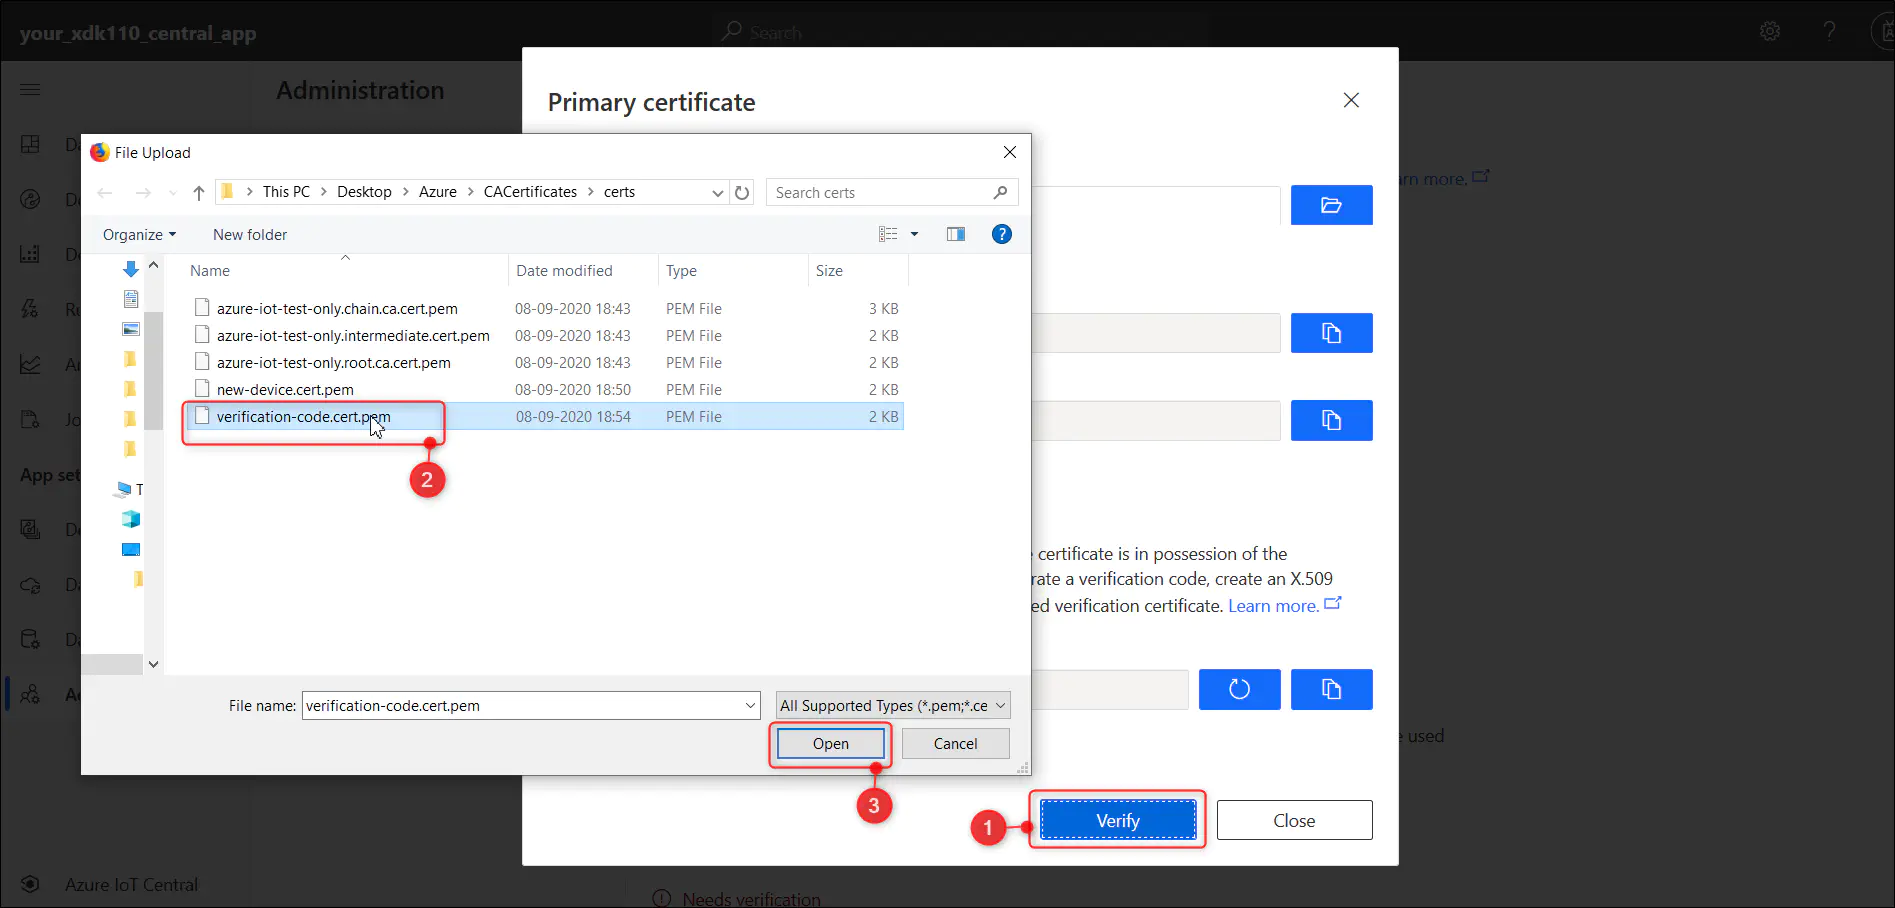
3.3.5. Return to the IoT Central window, click on Verify button and specify the path to generated verification certificate verification-code.cert.pem in the previous step.
3.3.6. Once uploaded the verification will be done and the info will be updated to ‘Verified’. Then you can go ahead and close the window.
3.4. Save the changes to the enrollment group by clicking on ‘Save’
Customize and publish device template
With the latest version of IoT Central, you NEED NOT create and publish a device template before connecting the device. It is capable of automatically creating and publishing a default version of device template upon initial connection of the device itself. Thus you can skip section 4 and continue with section 5 if needed.
4.1. Create a device template
4.1.1. Go to the ‘Device templates’ page and select ‘New’.
4.1.2. On the ‘Select template type’ page scroll down the ‘Featured device template’ list and select XDK110. Then select ‘Next:Customize’
4.1.3. On the ‘Review’ page, select ‘Create’.
4.1.4. After a few seconds, you can see your new device template

If XDK110 was not on the list, you can also make use of the DCM in the workbench to create a custom template by selecting ‘IoT device’ instead of XDK110. Please find the latest DCM at ‘https://devicemodels.azure.com/dtmi/bosch/xdk110-1.expanded.json’ which can be imported as the device model. The ‘Import a model’ option will be available to you in the ‘Create a model’ page which comes up soon after creating.
4.2. Visualizing data
4.2.1. The quickest way to bring up views is to make use of the tile ‘Generate default views’ from the ‘Views’ tab
4.2.2. In the following page you can select which all views to be created out of the default options : Overview, Commands and About
4.2.3. Select ‘Generate default view(s)’ button to create the views.
4.2.4. After few seconds, you can see that an Overview and an About view would have generated.
4.3. Adding a new ‘Settings’ form for you to manage the device:
4.3.1. Select the ‘Views’, and then select the ‘Editing device and cloud data’ tile to add a new view.
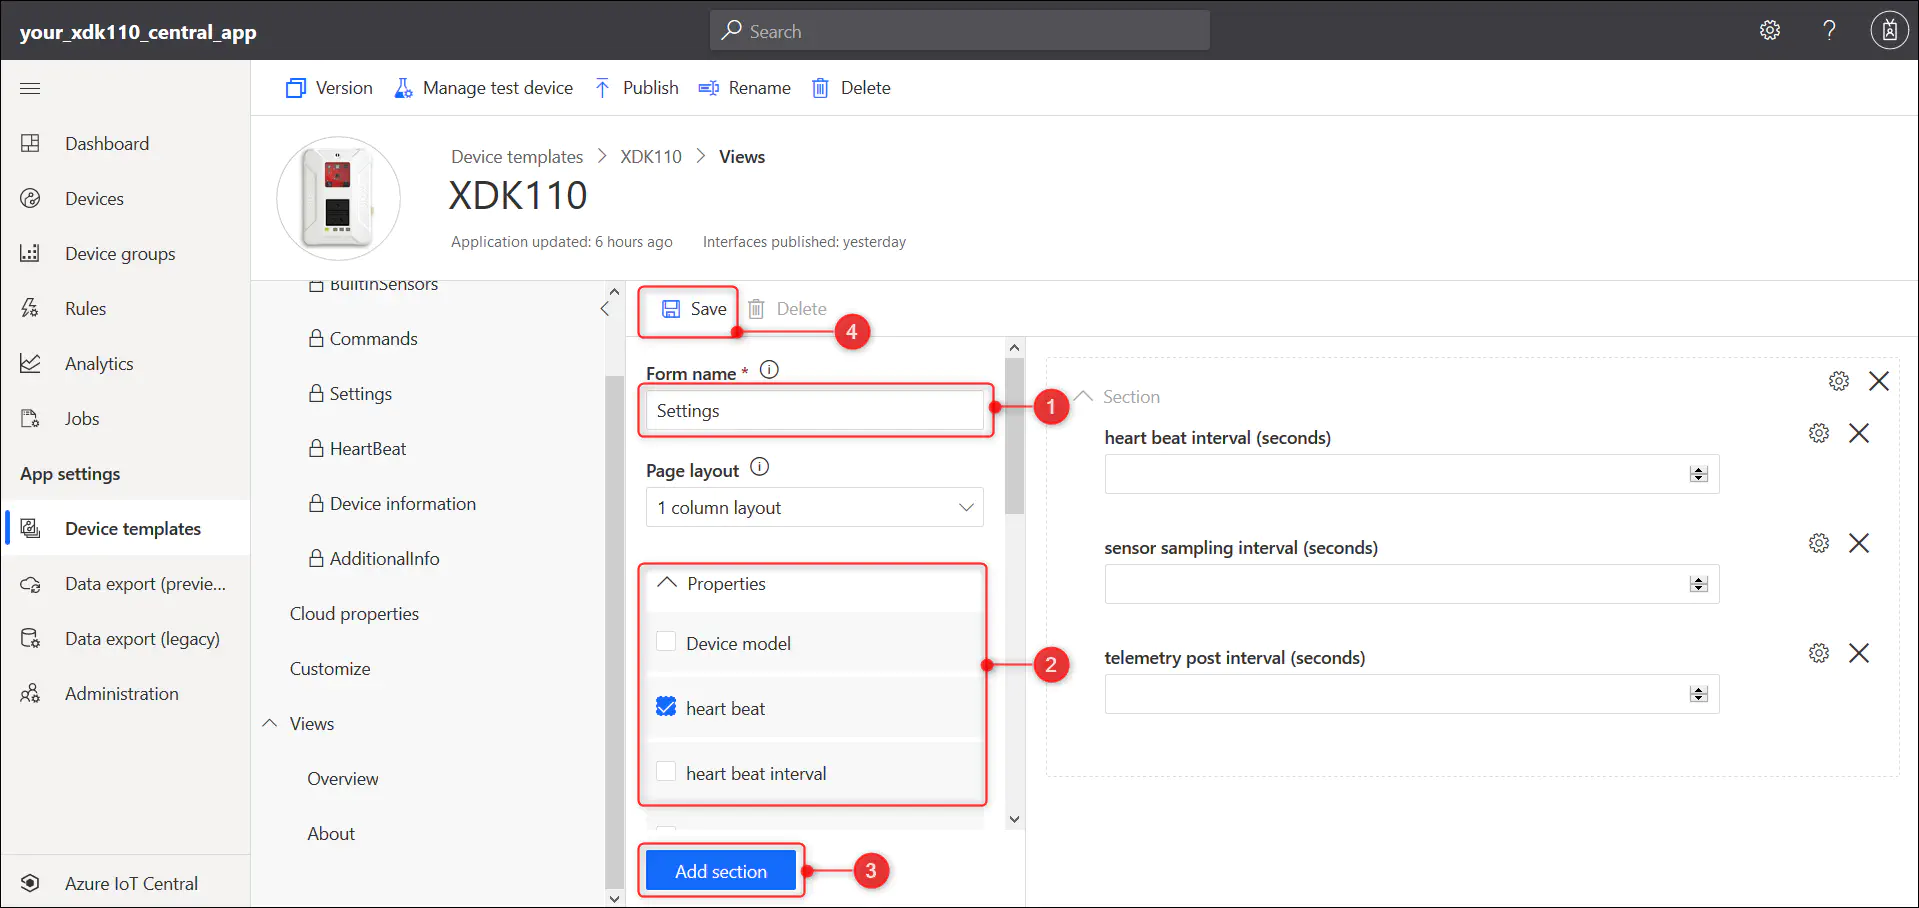
4.3.2. Change the form name to ‘Settings’
4.3.3 Select the Telemetry Post Interval. Heartbeat Interval and Sensor Sampling Interval properties from the ‘Properties’ drop down. Then select ‘Add section’.
4.3.4 Select ‘Save’ to save the new Settings form
4.8. Publish device template
4.8.1. Select the Publish button
4.8.2. On the Publish this device template to the application dialog, select Publish.
4.8.3. After you publish a device template, it will be visible on the Devices page.
Update configuration file
In order for you to configure your device, you can make use of config.json file. Please find the example file from the workbench at location ‘AzurePlugAndPlay/resources/config/config.json’. You can play around with different options are per your requirement. Let’s discuss minimum changes that are required to connect the device and visualize data is discussed here.
5.1. Update deviceInfo section
5.1.1. Update the value of deviceId with the name used for creating the X.509 device certificate. As example we took ‘myXdk110’ at step 2.5. This is optional field, without this the device will consider the WLAN MAC ID as the device id.
5.1.2. Update the the value of idScope with the ID Scope of the created IoT Central Application. Please find this detail within the IoT Central Application at ‘Administration’ → ‘Device connection’ → ‘ID Scope’
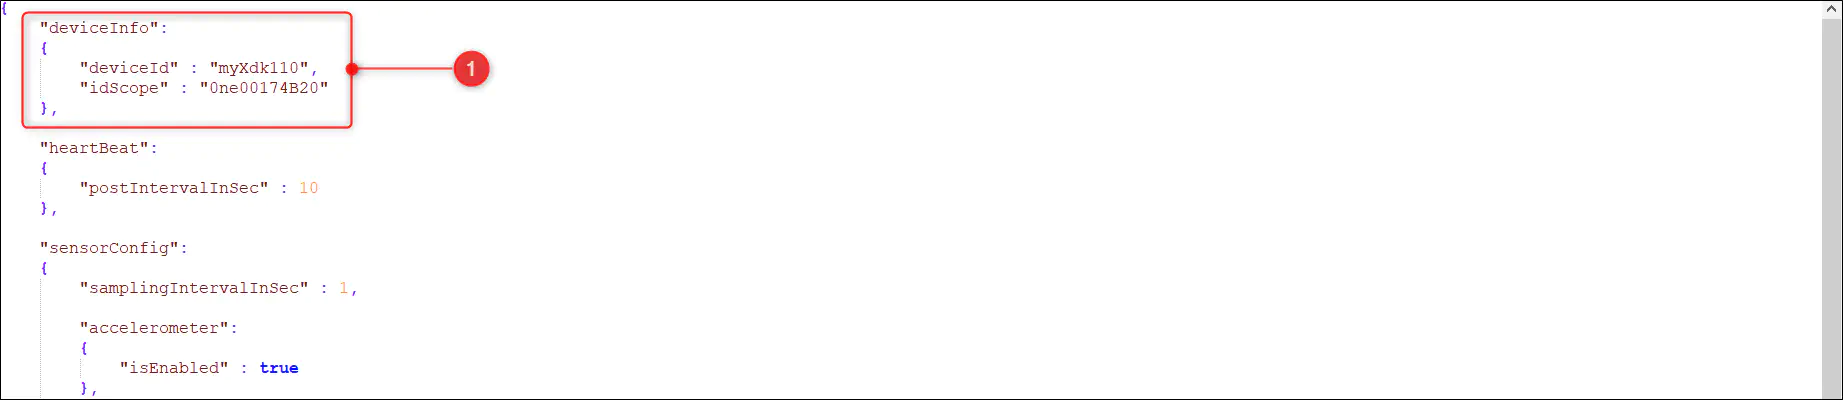
Please remember to keep the details within double quotes.
5.2. Update wlan section
5.2.1. Update the value of ssid with SSID of the WiFi network to be connected to
5.2.2. Update the value of password with the password to the WiFi network
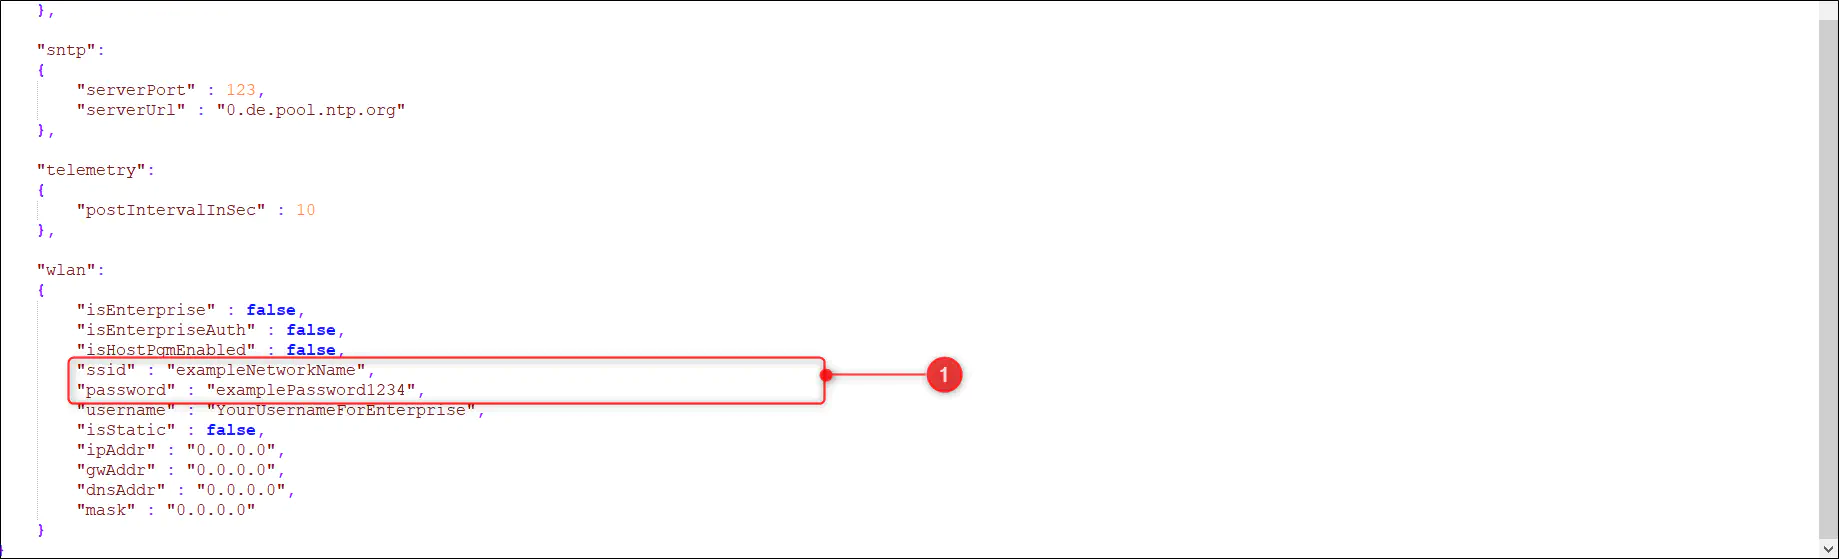
Please remember to keep the details within double quotes.
5.3. Save the file
Keep the configuration file and credentials in SD card
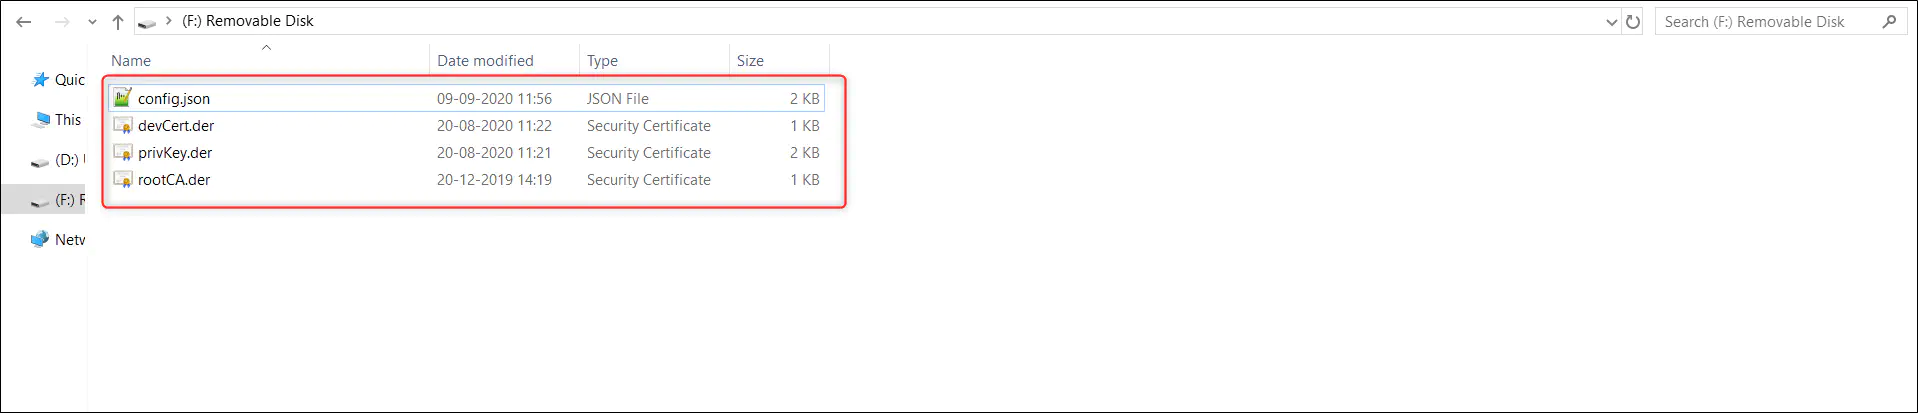
You need to provide the XDK with four files through SD card, before turning it on. As part of this step you need to copy the following files to SD card and insert the card in to your device.
6.1. Copy the config.json(which was updated in the section 5) to SD card.
6.2. Copy the devCert.der(created at the end of step 2.5.) from the ‘CACertificates/certs/’ to SD card.
6.3. Copy the privKey.der(created at the end of step 2.6.) from the ‘CACertificates/private/’ to SD card.
6.4. Copy the rootCA.der from location ‘AzurePlugAndPlay/resources/certificates/’ to SD card.
Please keep in mind that rootCA.der file is common for all devices and is different from 'azure-iot-test-only.root.ca.cert.pem'. The rootCA.der file is used to ensure that it is connecting to Azure endpoint itself.
6.5. Insert the SD card to your device
Flash the application to your device and get connected
7.1. Flash the AzurePlugAndPlay application. Please keep in mind that this step is only needed if your XDK doesn’t carry the AzurePlugAndPlay application already.
7.1.1. Open the XDK Workbench
7.1.2. Connect your XDK110 device to the Workbench through USB or JLink.
7.1.3. Import the ‘AzurePlugAndPlay’ application from the XDK-Examples
7.1.4. Build the project and flash the device
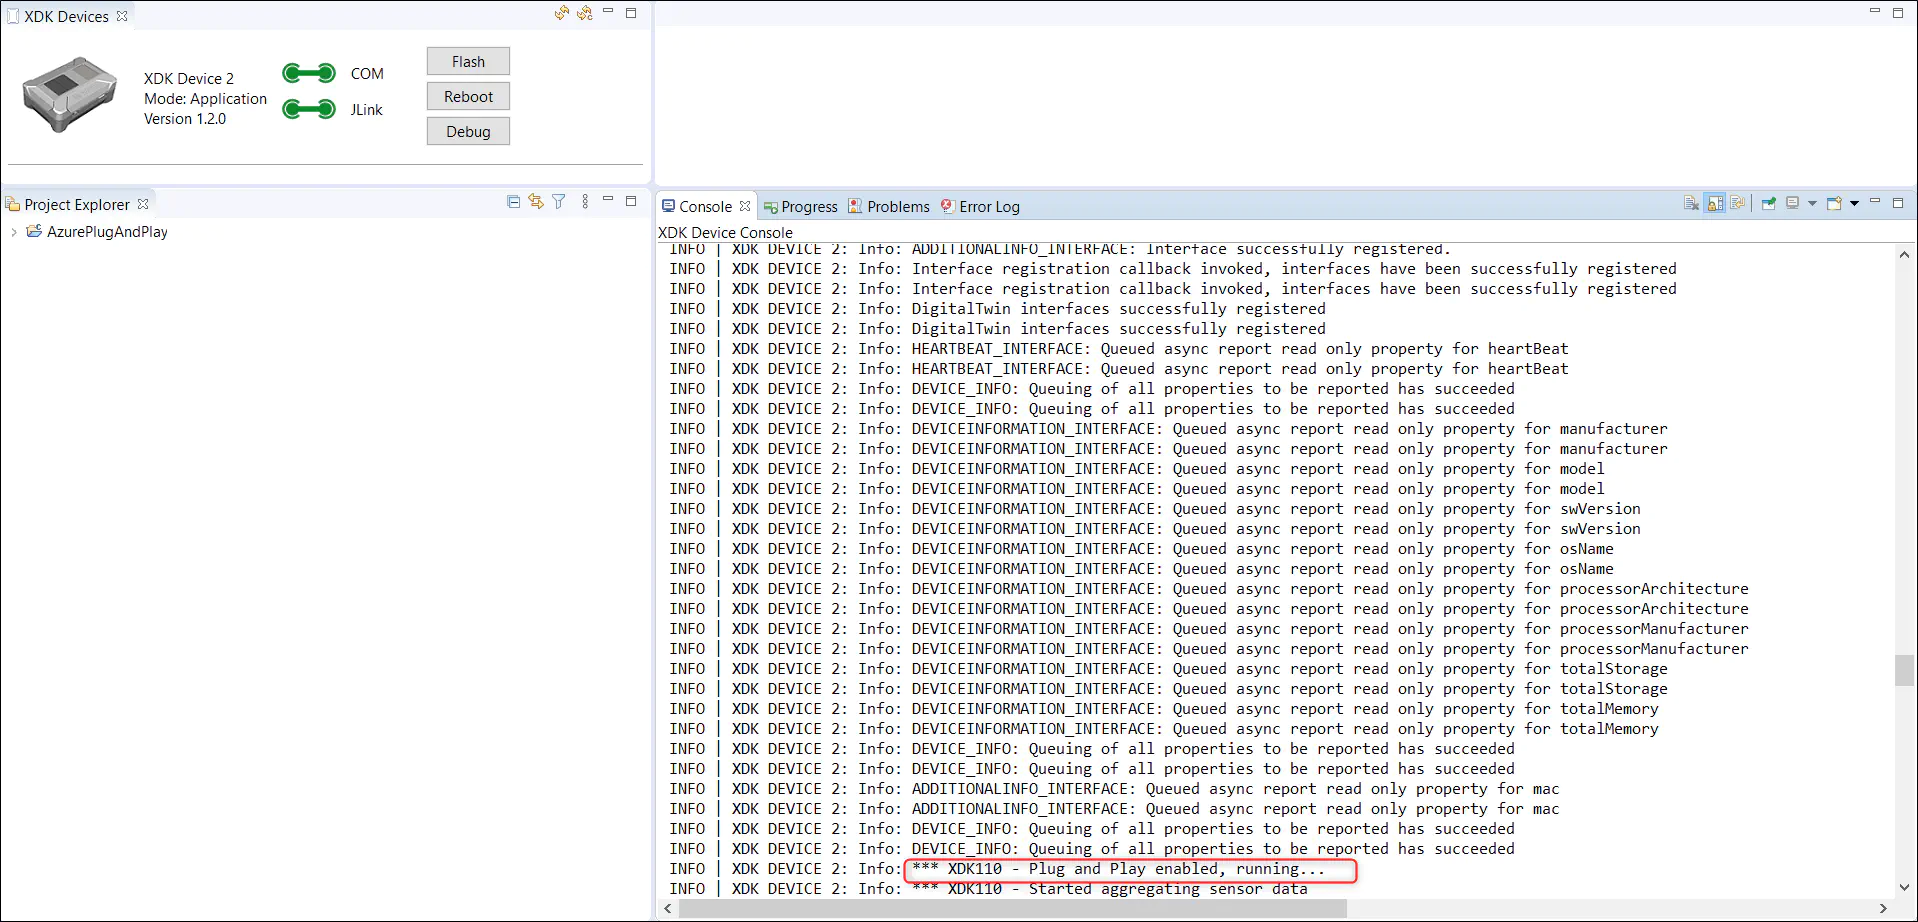
The application is expected to run, soon after flashing your device.
7.2. When connected through USB you can listen to the console logs to get the real time execution details of your device.
7.3. Explore the Views of your device
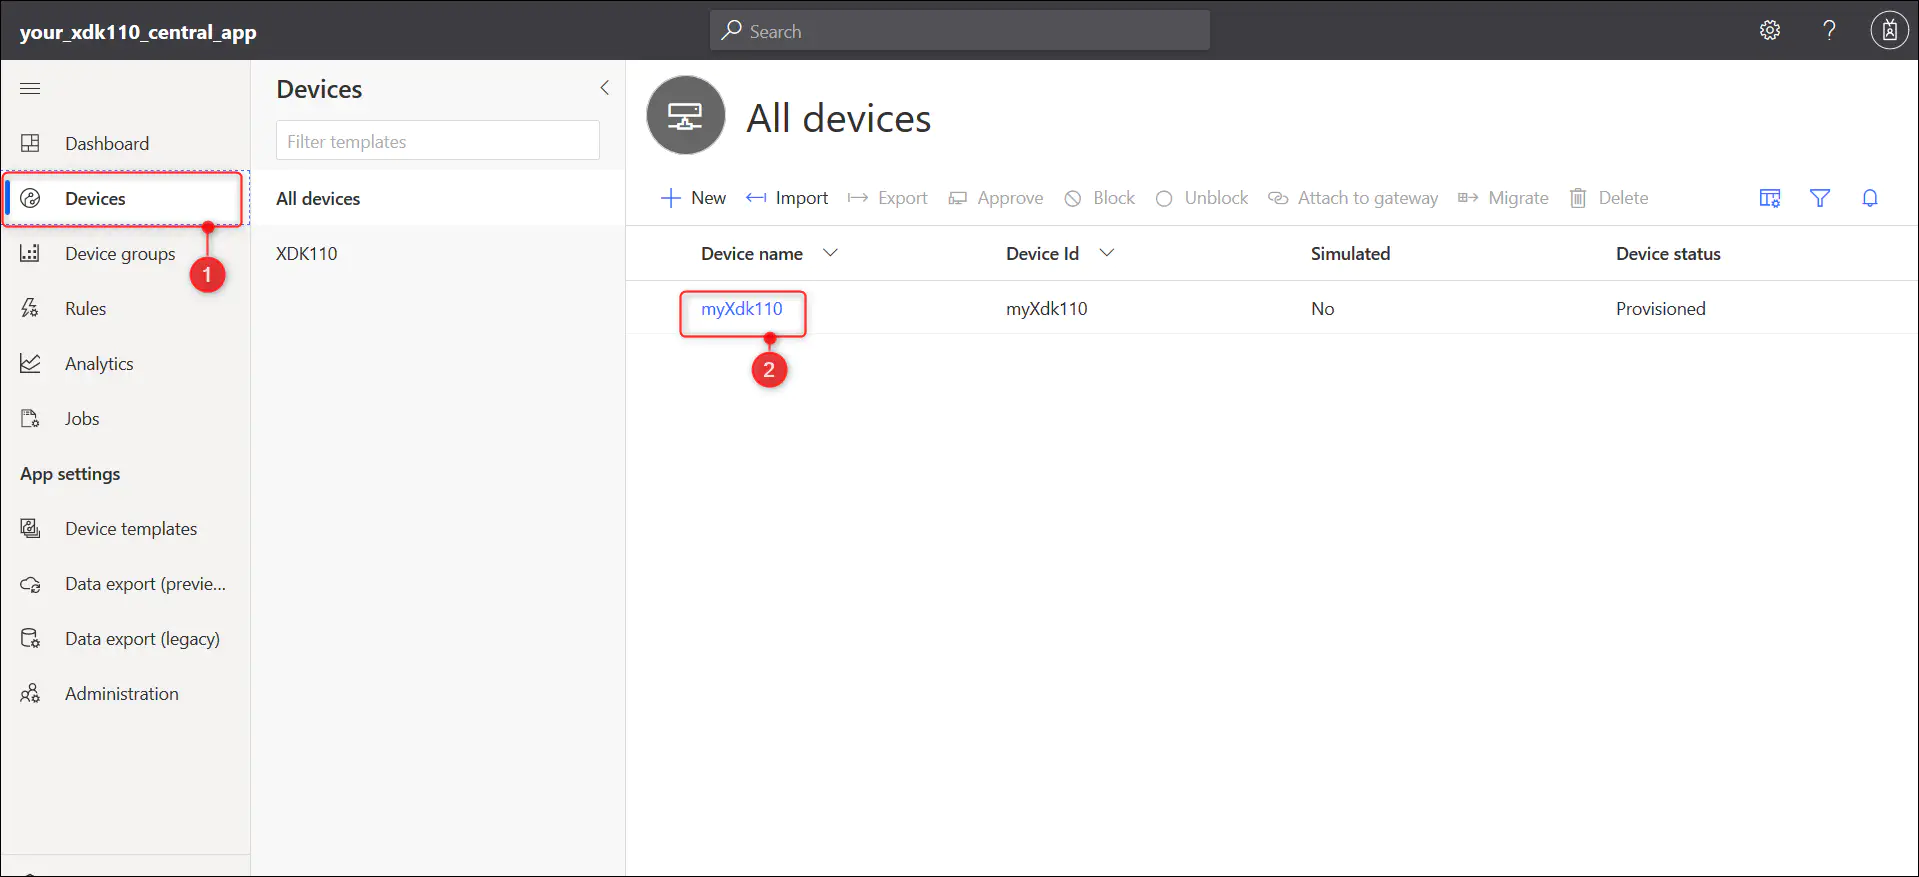
7.3.1. Go to ‘Devices’ page within IoT Central application
7.3.2. Once the console says ‘Plug and Play enabled, running…’ you will be able to see that the device in the ‘All devices’ list as well as in the ‘XDK110’ list.
7.3.3. Select your device (in this example myXdk110) from the list and explore different views
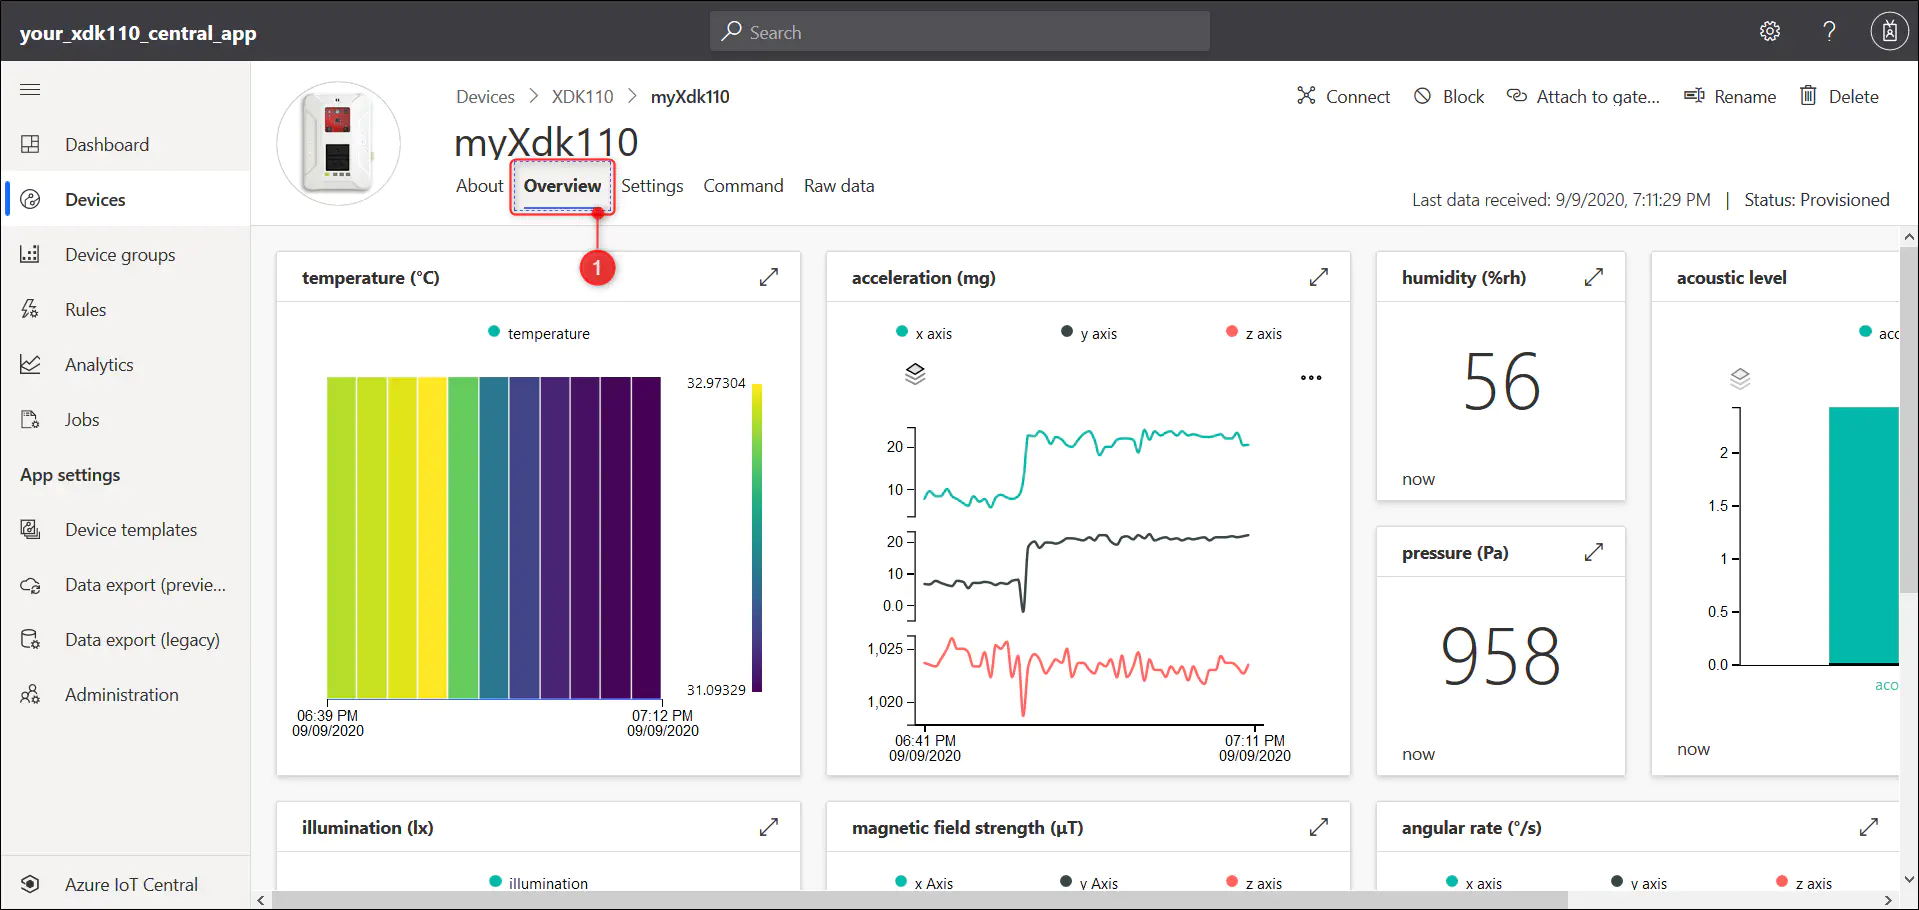
7.3.4. Select the ‘Overview’ page to view the incoming data from your device. Please keep in mind that at times it might take few seconds to represent the data as graphs.
7.3.5. You use the ‘Settings’ page to change the intervals at which the sensors has to be sampled, telemetry data to be posted and the heart beat message has to be posted.
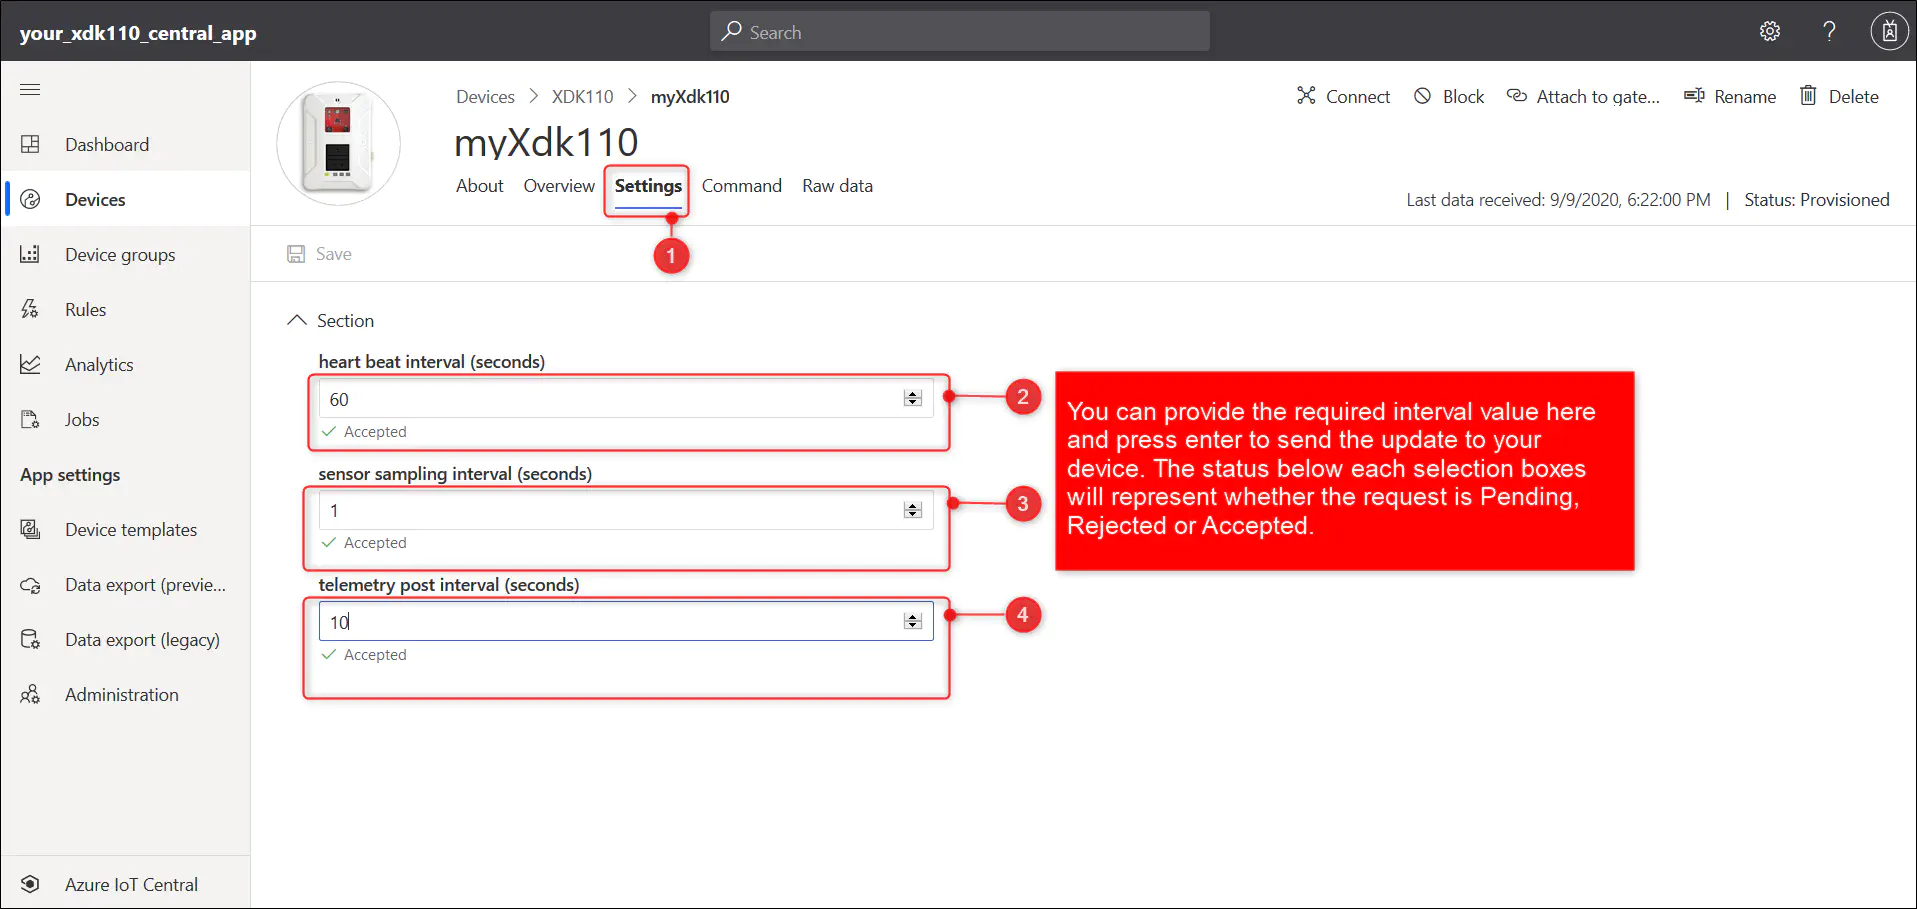
You can set the intervals to Zero to stop the corresponding operations.
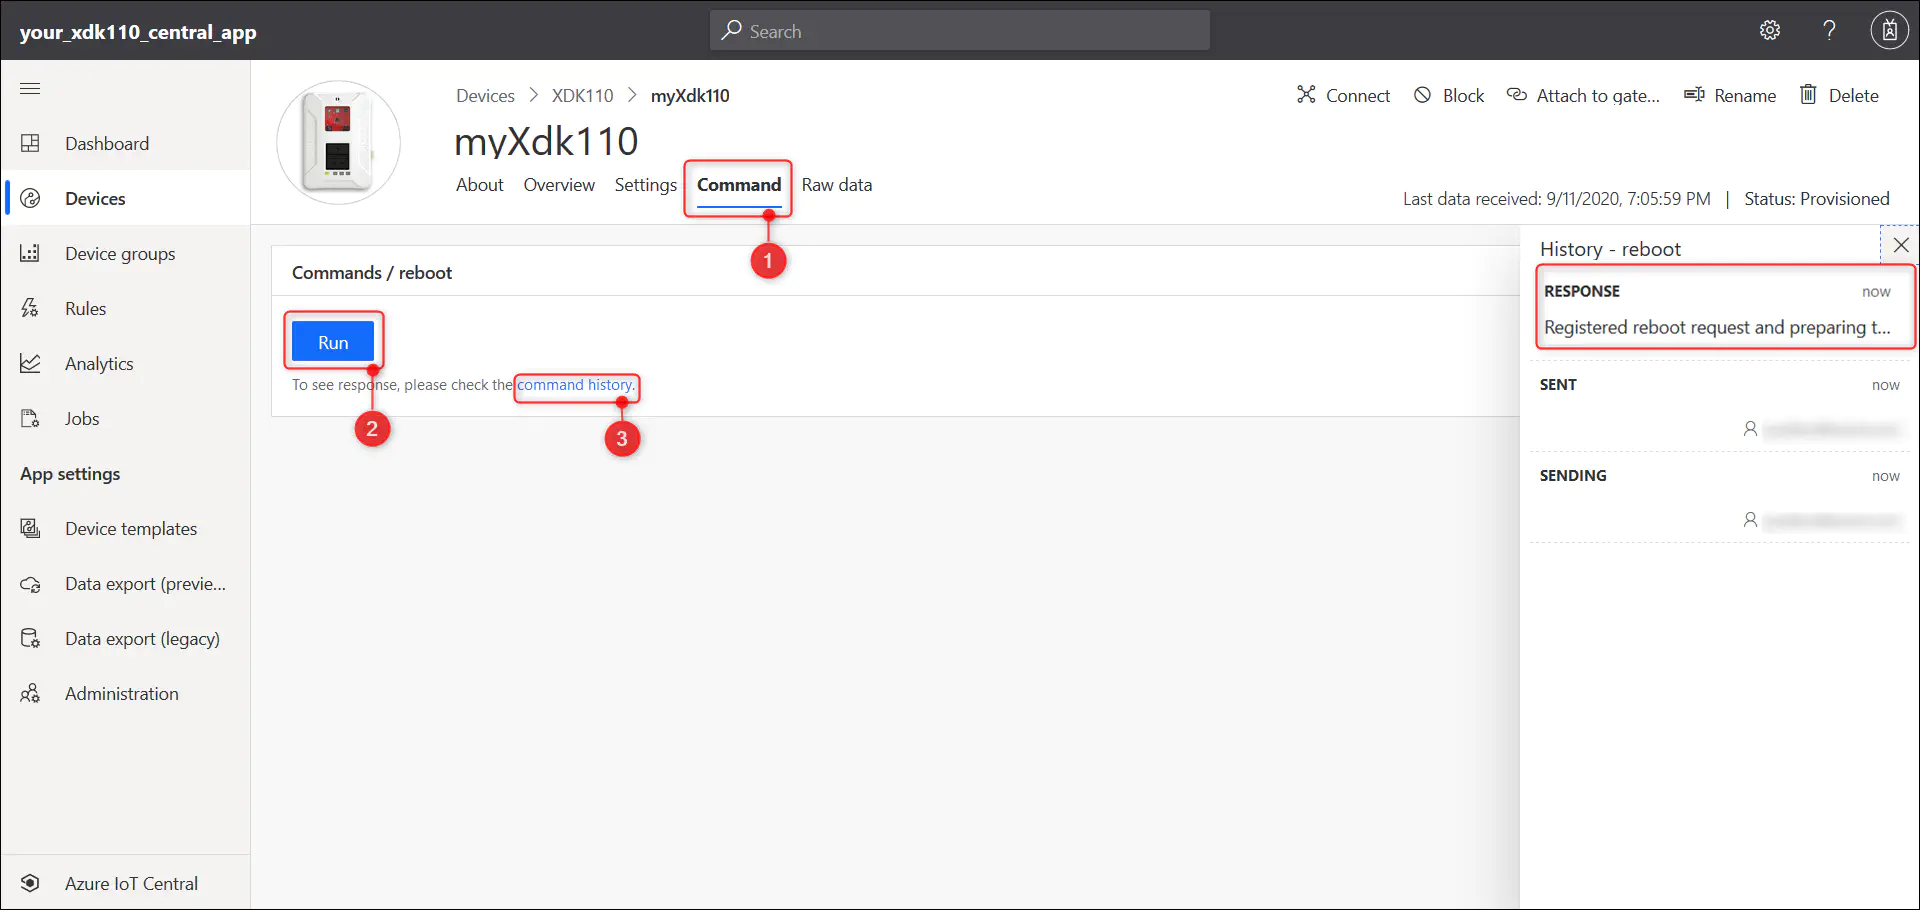
7.3.6. The ‘Command’ page will let you reboot your device by selecting the ‘Run’ button within the ‘Command/reboot’ section. You can see the response within the history pane by clicking the command history link
7.3.7. The ‘About’ window will give you the device informations such as the WLAN MAC Address, Software Version etc.
7.3.8. You can make use of the ‘Raw Data’ page(get generated by default) to checkout the raw data traffic as well.
Once the application runs, the files in the SD card will be copied to internal storage and the original ones will get converted to *.bkp. From then onward your device need not carry the SD card to function. The SD card is only needed when you need to modify these files. Then the *.bkp file can be replaced with new *.der file and the SD card can be reinserted to your device. It will require a reset of your device to take in the new modifications.

Additional details Connecting to IoT Hub
For connecting your device with IoT Hub you will need to make use of device provisioning service(DPS) as well.
8.1. Follow the steps discussed in the page ‘Quickly Setup IoT Hub and DPS’ to quickly setup new IoT Hub, DPS service and link them together.
8.2. If already not created, follow the steps in section 2 to create X.509 certificates.
8.3. Upload and verify your X.509 certificate with the DPS service
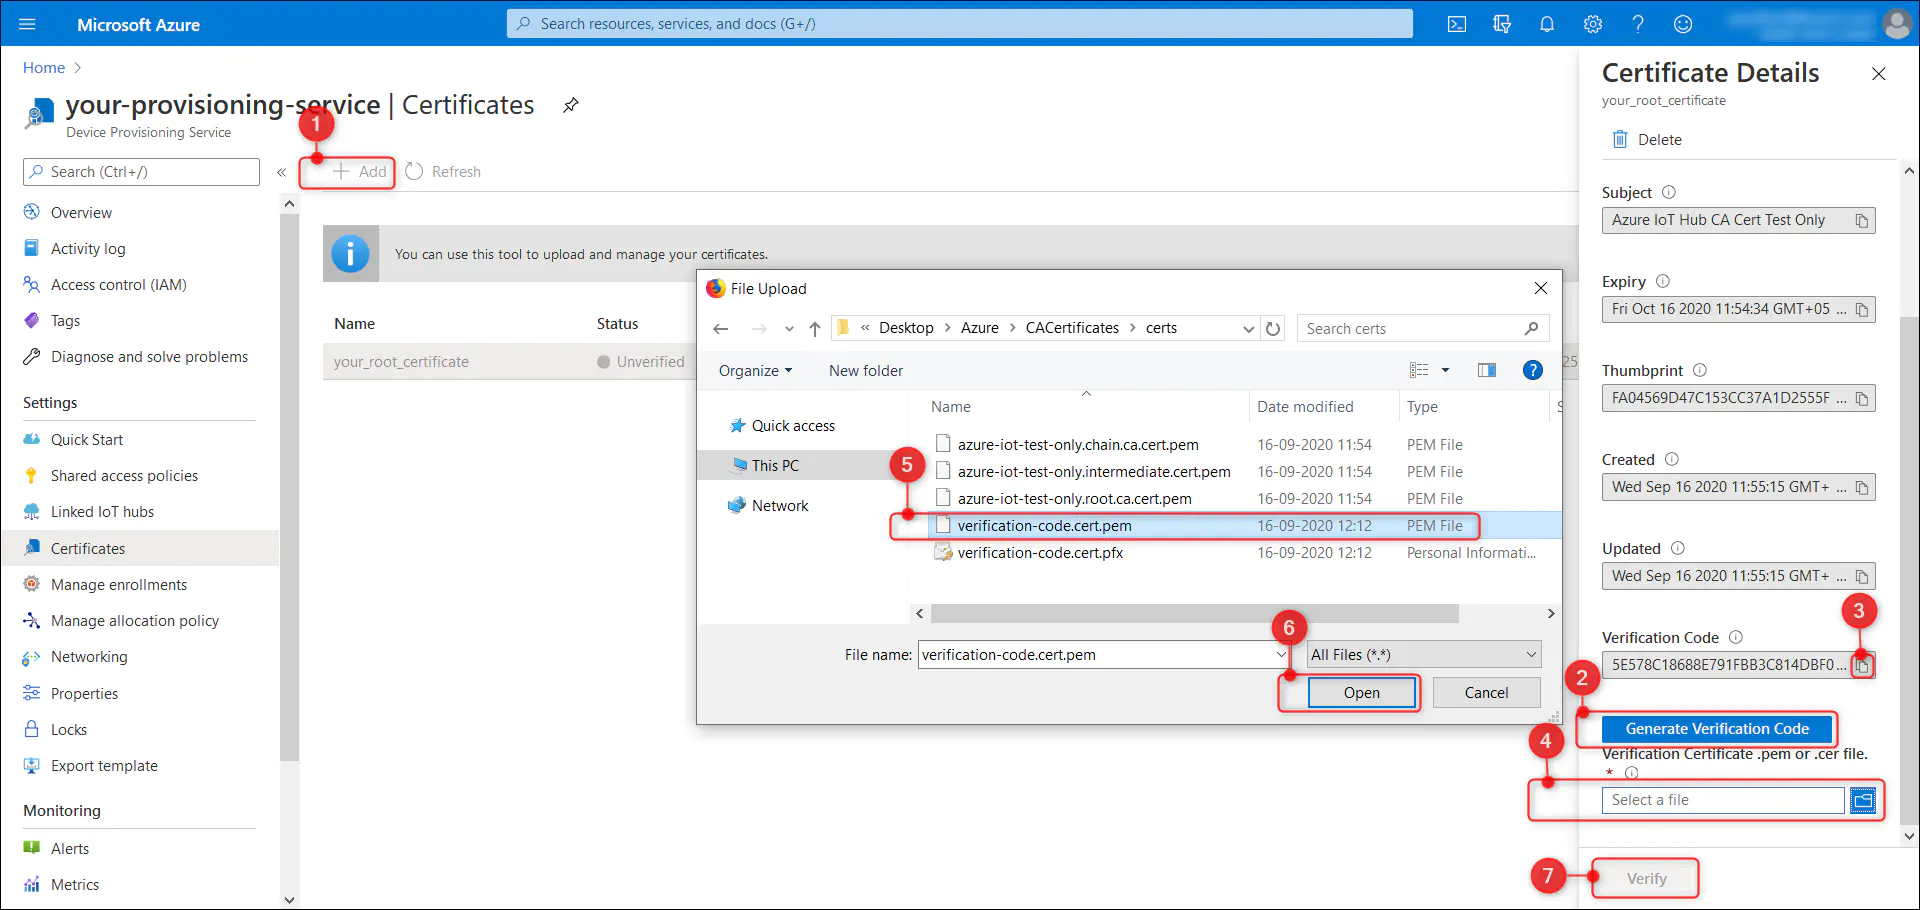
8.3.1. Go to created DPS service and from ‘Certificates’ tab select the ‘+ Add’ button.
8.3.2. Give a suitable name for your root certificate(for example your_root_certificate) within the ‘Certificate Name’ text box
8.3.3. Upload your 'azure-iot-test-only.root.ca.cert.pem', created during section 2, to the ‘Certificate .pem or .cer file’ box and save using the ‘Save’ button.
Once saved, your certificate should be visible in the ‘Certificates’ page after page refresh.
8.3.4. Select the your_root_certificate from the list to get to the side panel and select ‘Generate Verification Code’ button. This will generate a new code in ‘Verification Code’ box.
8.3.5. Copy the verification code using the ‘copy to clipboard’ button and execute the step 3.3.4 to create new verification certificate, ‘verification-code.cert.pem’ in the “CACertificates/certs/” folder
8.3.6. Upload the verification certificate to ‘Verification Certificate .pem or .cer file’ box and click on ‘Verify’ button to verify.
8.4. Add enrollment group in DPS and configure the group to connect to your IoT Hub
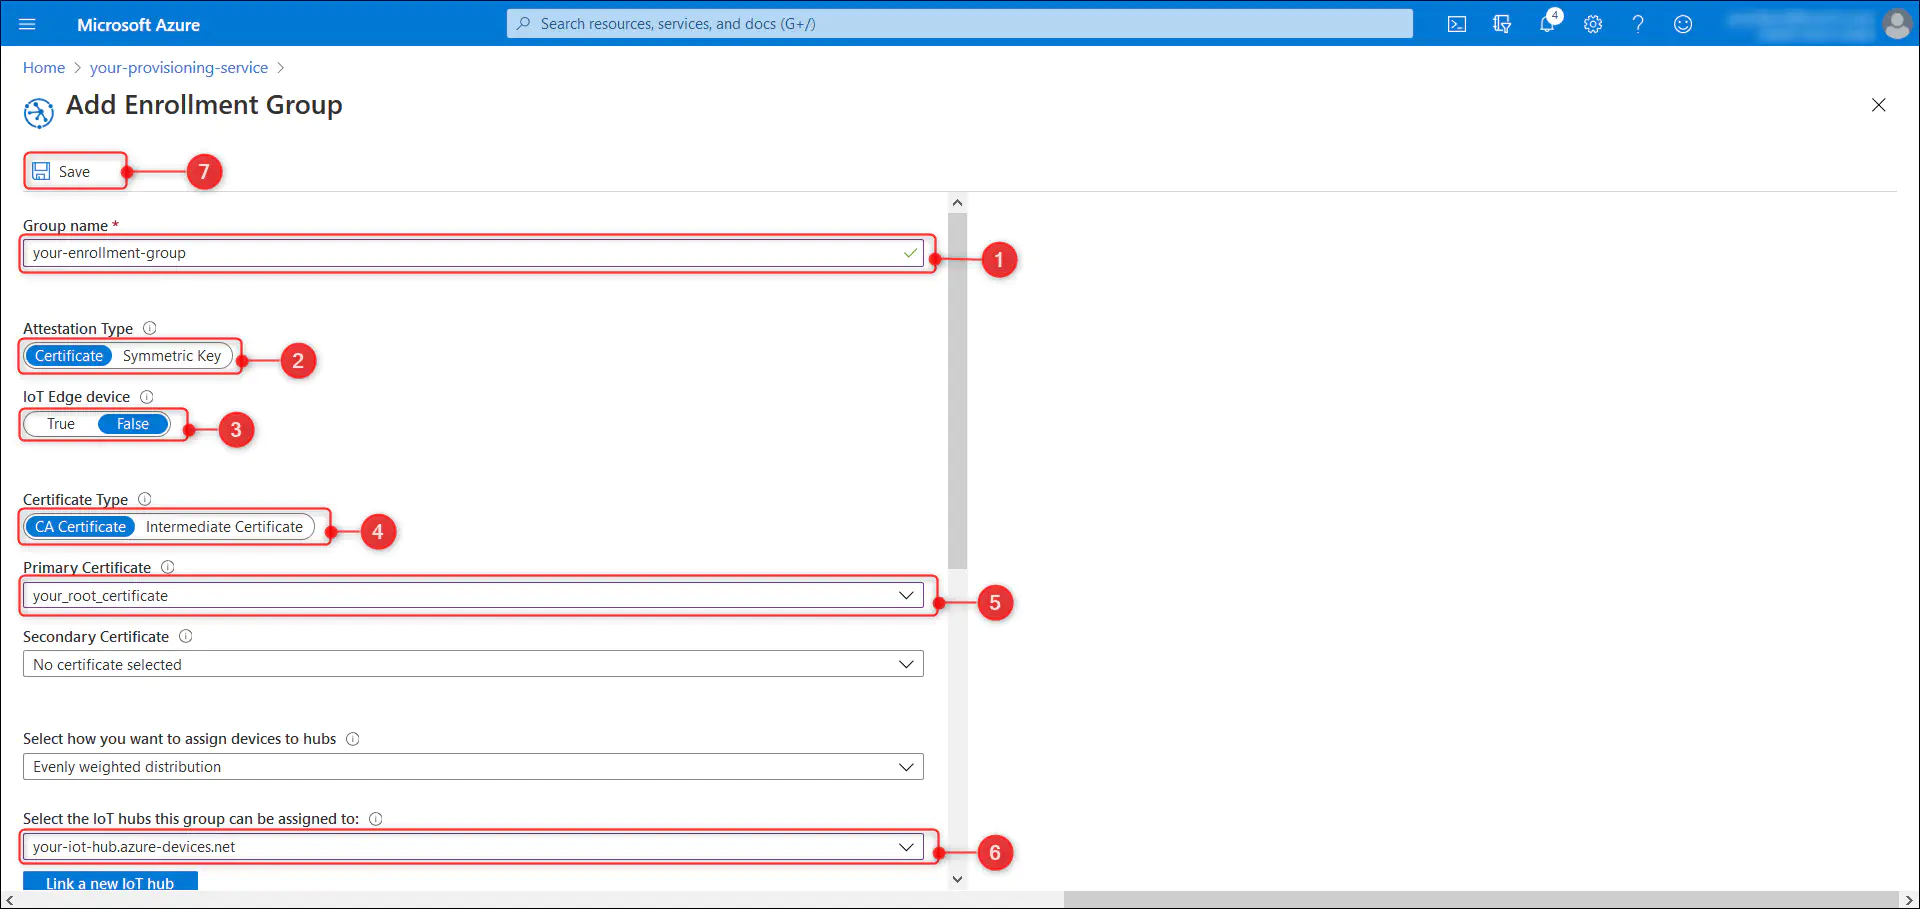
8.4.1. From the ‘Manage enrollments’ tab select the ‘Add enrollment group’ button.
8.4.2. Provide a name of your choice in the ‘Group name’ text box, select ‘Certificate’ as ‘Attestation type’
8.4.3. Select the ‘IoT Edge Device’ to be ‘False’
8.4.4. Select the ‘Certification type’ to be ‘CA Certificate’.
8.4.5. Select the verified certificate, your_root_certificate, from the **’**Primary certificate’ drop down list.
8.4.6. Select the IoT Hub name(for example ‘your-iot-hub.azure-devices.net’) from the ‘Select the IoT hub this group can be assigned to’ drop down list and save using the ‘Save’ button
8.5. Update the idScope detail in the config.json with ID scope of your DPS service. You can get the ID scope of DPS from ‘Overview’ tab. Rest of the details in config.json can be kept as such from section 5.
8.6. Load the updated config.json to your device through SD card, turn on your device and get connected to your IoT Hub. The ‘IoT devices’ tab of your IoT Hub should reflect your device name(myXdk110) within few seconds.
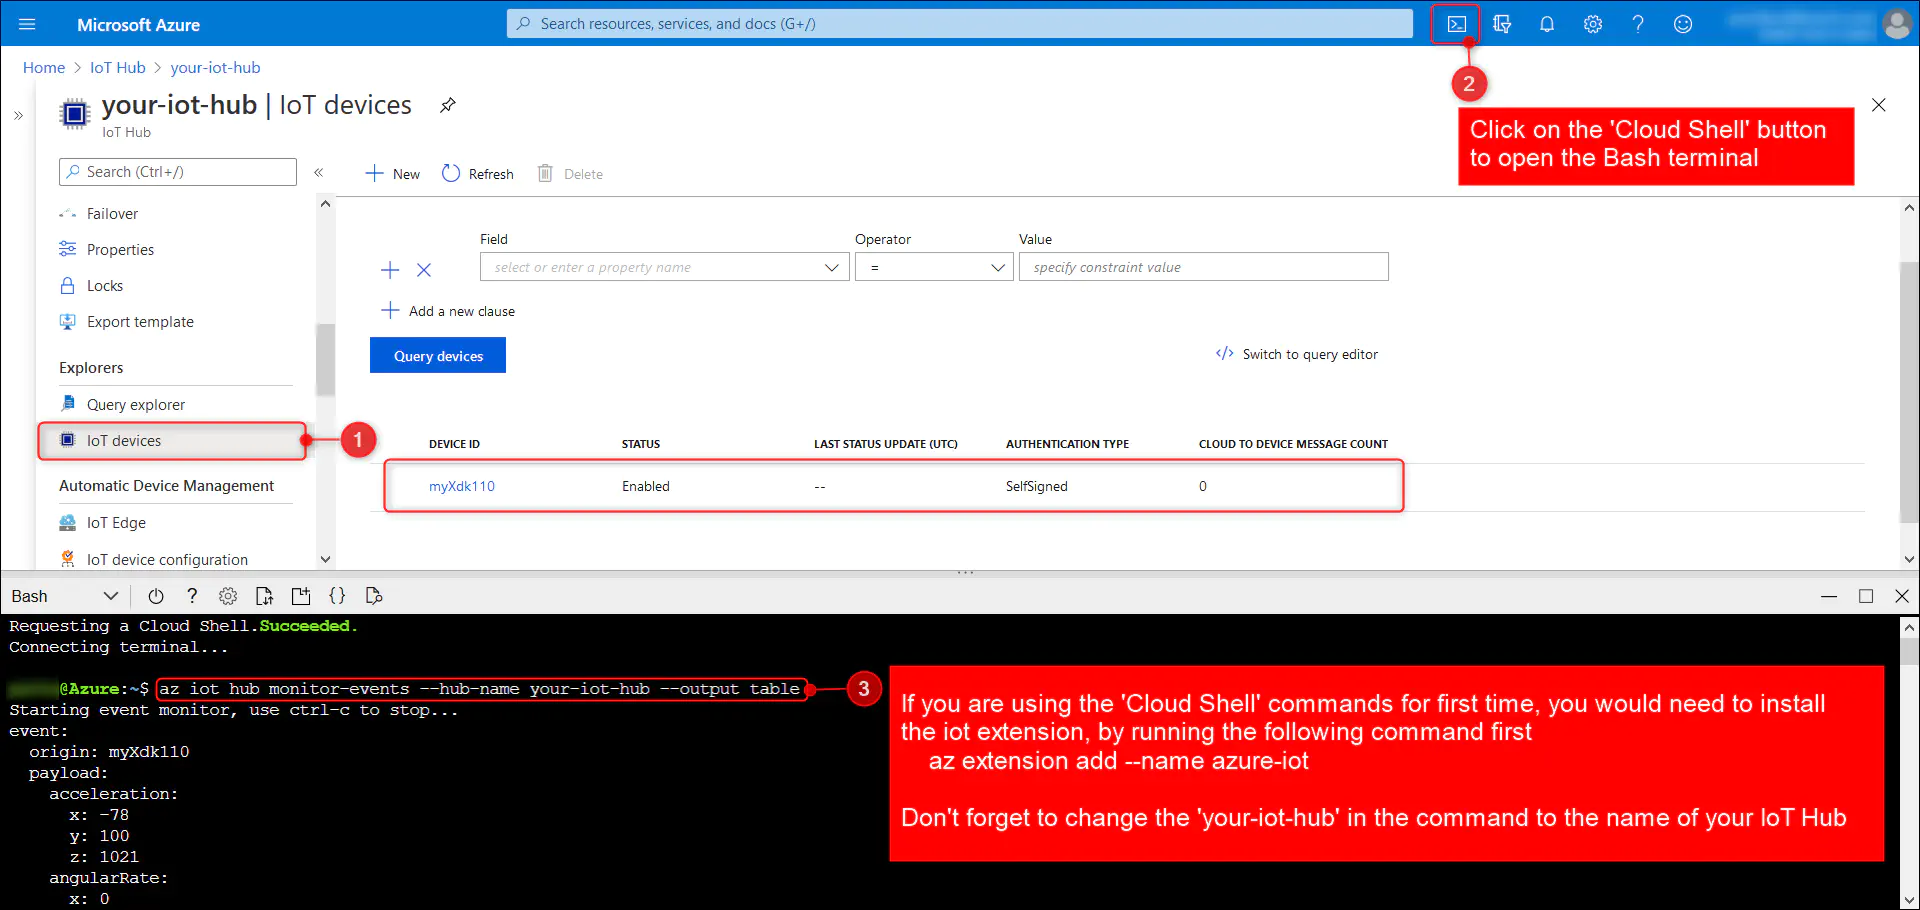
You can use monitor-events within ‘Azure Cloud Shell’ commands to monitor the data coming in from your device.
References
- Azure IoT Central Documentation : https://docs.microsoft.com/en-us/azure/iot-central/core/
- Azure IoT Plug And Play tutorial : https://docs.microsoft.com/en-us/azure/iot-pnp/
- Azure IoT Hub tutorial : https://docs.microsoft.com/en-us/azure/iot-hub/
- Azure DPS tutorial : https://docs.microsoft.com/en-us/azure/iot-dps/